
Embarking on a hike or backpacking trip is an exhilarating experience, a chance to reconnect with nature and challenge yourself physically and mentally. However, before you even set foot on the trail, there’s a crucial step that can make or break your adventure: understand how to pack a backpack. It’s not just about throwing your gear into a bag; it’s about understanding the principles of weight distribution, organization, and accessibility. A properly geared adventure can be the difference between a comfortable, enjoyable journey and a miserable, back-breaking slog. So, let’s dive into the art and science of packing like a pro!
- Introduction – Why Proper Backpack Packing Matters
- Step 1 – Choose the Right Backpack for Your Trip
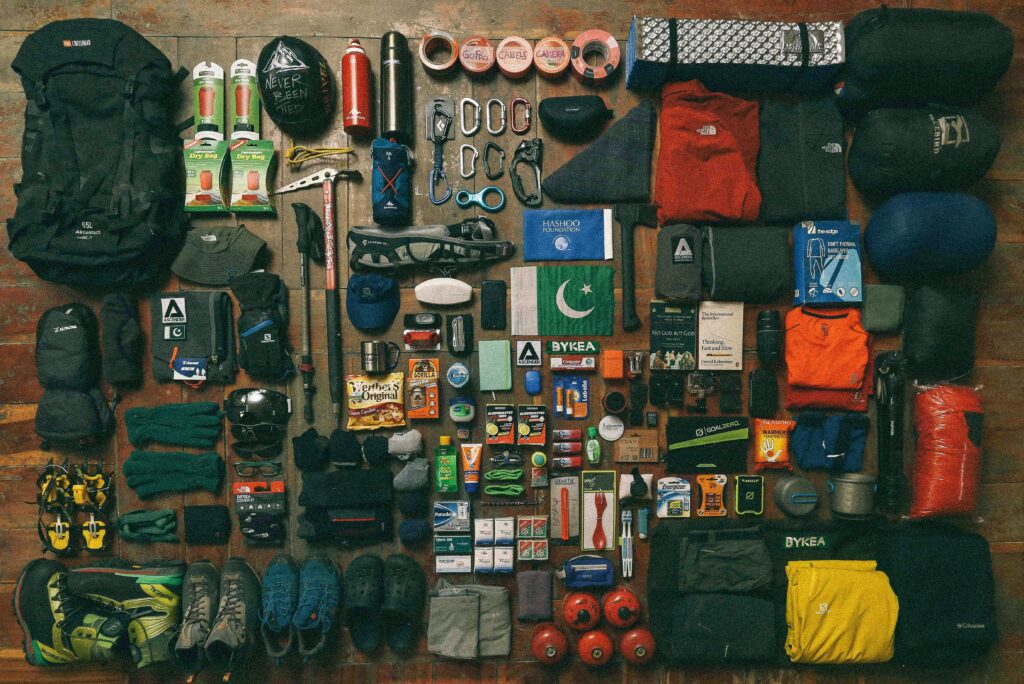
- Step 2 – Lay Out All Your Gear Before You Pack Your Backpack
- Step 3 – Understand Weight Distribution Principles
- Step 4 – Pack your Backpack in Logical Zones
- Step 5 – Use External Pockets and Straps Wisely
- Step 6 – Secure and Compress Your Load
- Step 7 – Test Your Backpack Before the Trip
- Common Mistakes to Avoid When Packing a Backpack
- Final Tips for Efficient and Comfortable Packing
- FAQs
Introduction – Why Proper Backpack Packing Matters
The Importance of a Smart Backpack
Smart packing is paramount for a successful trip. It’s not just about fitting everything inside; it’s about strategically organizing your gear to ensure comfort, balance, and accessibility. When you pack correctly, you distribute the weight evenly, preventing unnecessary strain on your back and shoulders. This allows you to maintain proper posture and conserve energy, making those long miles on the trail far more manageable. Moreover, smart packing means knowing where everything is, saving you precious time and frustration when you need to grab your rain jacket during a sudden downpour or access your first aid kit in an emergency. Remember, the goal is to make your backpacking trip as enjoyable and efficient as possible, and it all starts with how you equip yourself.
Benefits of an Efficient Backpack (weight distribution, compression and more)
Efficient packing offers a multitude of benefits that extend far beyond mere convenience. In fact, efficient packing:
- Enhances your comfort by distributing weight evenly, minimizing strain and fatigue.
- Improves your balance by preventing wobbling on uneven terrain, reducing the risk of falls.
- Maximizes space through the use of packing cubes or stuff sacks for compressing bulky items.
- Ensures easy access to frequently used items like water bottles and rain gear.
- Promotes safety Keep first-aid kits and emergency supplies readily available by placing them in the exterior of your pack.
Therefore, taking the time to pack efficiently is an investment in your comfort, safety, and overall enjoyment for your wonderful adventure.
How Packing Affects Your Hiking Experience
The way you gear up and prepare directly impacts your entire hiking experience, influencing everything from your physical comfort to your mental state. Imagine starting a multi-day hike with a poorly packed bag. Heavy items are shifting around, digging into your back, and throwing off your balance. Each step becomes a struggle, and you quickly tire. You develop blisters from the ill-fitting shoulder straps, and your back aches with every mile. You start to resent the weight on your shoulders and lose your appreciation for the stunning scenery around you. On the other hand, imagine embarking on the same hike with a well-packed haversack. The weight is evenly distributed, and the pack feels like an extension of your body. You move effortlessly along the trail, conserving energy and enjoying the breathtaking views. You know exactly where everything is, so you can quickly grab your water bottle, adjust your layers, or apply sunscreen without breaking stride. You feel confident, prepared, and in control, allowing you to fully immerse yourself in the beauty of nature. The difference between these two scenarios is not just about the gear you carry, but about how you pack it. Proper gearing transforms a potentially miserable experience into an unforgettable adventure. If you have to learn how to organise your travel kit for an optimal experience, do it now.
Step 1 – Choose the Right Backpack for Your Trip
Match Size to Trip Length
Selecting the appropriate backpack size is crucial for a comfortable and efficient exploration trip. Day hikes, typically lasting a few hours, require smaller packsack ranging from 15 to 30 liters. These packs are designed to carry essentials like water, snacks, a light jacket, and a first aid kit. On the other hand, overnight or multi-day journey trips demand larger packs, usually between 40 and 70 liters. These packs provide ample space for a sleeping bag, tent, cooking gear, extra clothing, and multiple days’ worth of food. Choosing the right size ensures you have enough room for everything you need without being weighed down by unnecessary space. Avoid the temptation to choose an oversized load, as this encourages overpacking. Remember, every extra pound adds to your burden and reduces your enjoyment of the trail. When in doubt, err on the side of a smaller pack and prioritize essential gear. After all, the goal is to travel light and experience the freedom of the outdoors. If you are going on long camping trips, you will need to pack a backpacking pack with a 70-liter capacity.
Check Fit and Adjustability
The fit and adjustability of your gear are critical factors in ensuring comfort and preventing injuries on the trail. A well-fitted backpack should transfer the majority of its weight to your hips, rather than your shoulders. This is achieved through a combination of torso length adjustment, hip belt, and shoulder straps. Start by measuring your torso length, from the base of your neck to the top of your hip bone. This measurement will help you determine the appropriate gear size. Next, adjust the hip belt so that it sits comfortably on your hip bones. The shoulder straps should then be adjusted to keep the pack close to your back without digging into your shoulders. Ensure that the load lifter straps, located at the top of the shoulder straps, are angled upward to pull the pack closer to your body. Finally, adjust the sternum strap to prevent the shoulder straps from sliding off your shoulders. Remember, a properly fitted backpack should feel like an extension of your body, allowing you to move freely and comfortably on the trail. Always pack my backpack to be easily carried.
Step 2 – Lay Out All Your Gear Before You Pack Your Backpack
Visual Assessment of your Backpack
Before you even think about placing anything inside your supply support, take the time to lay out all your gear on the ground. This visual assessment is a crucial step in the packing process, allowing you to gain a clear overview of everything you plan to bring on your trip. By seeing all your items in one place, you can identify potential redundancies, eliminate unnecessary gear, and ensure that you haven’t forgotten anything essential. Take a critical look at each item and ask yourself: Do I really need this? Is there a lighter or more compact alternative? Can I borrow this from someone else? Remember, every ounce counts, and reducing your pack weight can significantly improve your comfort and enjoyment on the trail. This visual assessment also helps you plan the organization of your kit, allowing you to group similar items together and strategize their placement inside the pack. So, before you start stuffing things haphazardly into your equipment bag, take a step back and assess your gear with a discerning eye.
Grouping Items by Function
Once you’ve laid out all your gear, the next step is to group items by function and line the inside of your pack for better organization. This organizational strategy makes it easier to find what you need quickly and efficiently on the trail. For example, create a sleep system group consisting of your sleeping bag, sleeping pad, pillow, and any sleepwear. Group your cooking gear together, including your stove, pot, utensils, and food. Create a clothing group with your base layers, insulating layers, rain gear, and extra socks. Organize your first aid supplies and other emergency items into a separate safety group. You can use packing cubes or stuff sacks to keep these groups neatly organized and compressed. Labeling each packing cube or stuff sack will further enhance your organization and make it even easier to locate specific items. By grouping items by function, you’ll spend less time rummaging through your backpack and more time enjoying the scenery. You can buy a waterproof pack for these items to keep them safe even when outside of your pack.
The “Less is More” Mindset
When it comes to packing for a hiking or backpacking trip, the “less is more” mindset is your guiding principle. Resist the urge to bring everything but the kitchen sink and instead focus on packing only the essentials. Every item you add to your backpack contributes to the overall weight you’ll be carrying, and even seemingly small items can add up quickly. Before you pack each item, ask yourself: Is this truly necessary? Can I do without it? Is there a lighter alternative? Can I share this with someone else? Challenge yourself to minimize your pack weight by making smart choices and leaving unnecessary items behind. Consider ultralight gear options, such as a lightweight tent, sleeping bag, and stove. These items may be more expensive, but the weight savings can be significant. Pack versatile items that can serve multiple purposes. A bandana, for example, can be used as a sweatband, a dust mask, a bandage, or even a coffee filter. Embrace the minimalist approach and discover the freedom of traveling light, just like a backpacking expert would. You’ll be amazed at how much more enjoyable your backpacking trip becomes when you’re not weighed down by unnecessary gear. Make sure to pack correctly.
Step 3 – Understand Weight Distribution Principles
Keep Heavy Items Close to Your Back
Proper weight distribution is crucial for a comfortable and safe backpacking trip. The most important principle is to position heavy items close to your back, near the center of gravity, is the ideal way to pack a backpack for stability. This helps maintain balance and reduces strain on your shoulder straps and back muscles. Imagine you’re building a tower – you wouldn’t put the heaviest blocks at the top, would you? The same logic applies here. Items like your food bag, water bottle(s) (if you’re not using utilize the side pockets of your backpack to store items that you may need quick access to while you’re hiking.), and cooking gear should be nestled inside your pack, as close to your spine as possible. This placement ensures that the weight is supported by your skeletal structure, rather than pulling you backward, especially when you’re hiking for long distances. Securing these heavy items with compression straps prevents them from shifting around, which can throw off your balance and cause discomfort. By adhering to this principle, you’ll find that carrying your pack feels much more stable and manageable, especially on uneven terrain. This will really assist when you hike.
Avoid a Bottom-Heavy Placement when you Pack your Backpack
While it might seem logical to place heavy items at the bottom of the pack for easy access, doing so creates a pendulum effect that can significantly increase fatigue and decrease stability. A bottom-heavy pack causes you to lean forward, straining your lower back and forcing your muscles to work harder to maintain balance. This is especially problematic on uphill or downhill sections of the trail. Instead, reserve the bottom of your pack for lighter, bulky items like your sleeping bag or extra clothing. These items provide cushioning and help fill out the space without adding excessive weight to the lower portion of your backpack. Think of it this way: you want the weight to be centered and stable, not pulling you down or rocking you back and forth. By avoiding a bottom-heavy pack, you’ll maintain better posture, conserve energy, and reduce the risk of strains and injuries during your hiking trip.
Step 4 – Pack your Backpack in Logical Zones
Bottom Zone – Lightweight and Bulky Items
The bottom of the pack is ideal for lightweight and bulky items that you won’t need until you reach your campsite. This includes your sleeping bag, sleeping pad, and extra clothing, such as base layers or camp shoes. These items are typically compressible and can fill out the space without adding significant weight to the lower part of your backpack. Consider using a stuff sack or compression sack to further reduce the volume of your sleeping bag and other bulky items. This will free up more space in the main compartment for heavier gear. Placing these items at the bottom of the pack also provides a cushioned base, protecting more fragile items from being crushed. Just remember to keep a trash bag or pack liner at the very bottom to protect your gear from moisture if you’re not using a waterproof pack. Always pack your backpack with the intention of keeping your equipment in good condition.
Middle Zone – Heaviest Gear
The middle zone, located between your shoulder blades and lower back, is where you should position the heaviest gear. This area corresponds to your center of gravity and provides the most stable and comfortable carrying position. Items like your food bag, cooking gear, water reservoir (if not stored in side pockets), and any other dense or heavy items should be strategically placed in this zone. Try to distribute the weight evenly on both sides of your spine to prevent imbalances. Use compression straps to secure these items and prevent them from shifting around during your hike. By concentrating the heaviest gear in the middle zone, you’ll maintain better balance, reduce strain on your back and shoulders, and conserve energy throughout your backpacking trip. It’s all about optimizing weight distribution for maximum comfort and efficiency.
Top Zone – Frequently Used Items
The top zone of your backpack should be reserved for items that you need to access frequently throughout the day. This includes your rain jacket, extra layers, first-aid kit, snacks, headlamp, map, and compass. These items should be easily accessible so you can quickly grab them without having to unpack your entire backpack. Consider using side pockets or a top lid compartment to store smaller items like lip balm, sunscreen, and insect repellent. A rain cover should also be readily available in case of sudden showers. The goal is to keep these essential items within reach so you can respond quickly to changing weather conditions, navigate effectively, and address any minor injuries or discomforts along the way. By organizing your backpack in this manner, you’ll be well-prepared for any situation and able to enjoy your hiking experience to the fullest. Pack your backpack with all the most important things on top.
Step 5 – Use External Pockets and Straps Wisely
Side Pockets for Water and Tools
Side pockets are invaluable for storing items that you need quick access to but don’t necessarily want taking up space inside your pack. Water bottles are prime candidates for side pockets, allowing you to stay hydrated without having to stop and unpack. Trekking poles, tent poles, or even a small camp chair can also be secured in side pockets, freeing up valuable space in the main compartment. Make sure to use the compression straps to secure these items and prevent them from shifting or falling out while you’re on the move. Some backpacks even have specialized side pockets designed specifically for water bottles, with elastic closures to keep them securely in place. By utilizing side pockets effectively, you can streamline your pack and keep essential items within easy access throughout your hiking trip. You will have easy access to your water bottle.
Hip Belt and Front Pockets for Essentials
Hip belt pockets and front pockets (if your backpack has them) are perfect for storing small but essential items that you need to access frequently and without taking off your pack. Think of these pockets as your personal command center, keeping vital gear within arm’s reach. Ideal items for hip belt pockets include your phone, camera, GPS device, snacks, lip balm, sunscreen, and insect repellent. Front pockets can be used for maps, compasses, or any other navigational tools. The key is to choose items that you’ll use regularly and that are small enough to fit comfortably in these pockets. Avoid overstuffing these pockets, as this can create pressure points and discomfort. By keeping these essential items close at hand, you’ll be able to react quickly to changing conditions, capture memorable moments, and stay fueled and protected throughout your multi-day hike.
Step 6 – Secure and Compress Your Load
Use Compression Straps
One of the most effective ways to stabilize your load and prevent gear from shifting around during your hiking trip is to utilize compression straps. Most backpacks come equipped with these straps, which are strategically placed around the pack to cinch down the contents and reduce overall volume. Start by tightening the compression straps at the bottom of the pack, working your way up to the top. This will help to draw the load closer to your back and prevent it from swaying. Pay particular attention to the compression straps that run horizontally across the main compartment, as these are crucial for securing larger items like your sleeping bag or tent. Don’t be afraid to really crank down on these straps, as the tighter the load, the more stable your backpack will be. Remember, a compressed and secure load not only improves your balance but also reduces the risk of gear damage. If you want to now how pack a backpack, then use compression straps.
Eliminate Empty Space
Empty space inside your backpack can lead to gear shifting, discomfort, and even damage to your equipment. To prevent this, it’s important to eliminate as much empty space as possible. One way to do this is by using stuff sacks or dry bags to keep your gear organized and. to compress your clothing and other soft item inside of your packs. These bags not only reduce volume but also help to organize your gear and protect it from moisture. Another technique is to fill any remaining gaps with smaller items like socks, underwear, or lip balm. You can even use a trash compactor bag as a makeshift compression sack to fill larger voids. The goal is to create a solid, compact load that won’t shift or settle during your hike. A well-filled backpack not only feels more comfortable but also provides better support and stability. Pack a backpack for backpacking and take what you need.
Step 7 – Test Your Backpack Before the Trip
Do a Short Practice Walk
Before embarking on your backpacking trip, it’s essential to test your packed backpack with a short practice walk. This allows you to identify any potential issues with weight distribution, fit, or comfort before you hit the trail. Load your backpack with all your gear and take it for a spin around your neighborhood or a local park. Pay attention to how the pack feels on your back and shoulders. Are there any pressure points or areas of discomfort? Does the pack feel stable and balanced, or does it sway from side to side? If you notice any problems, make adjustments to the straps or the packing arrangement until you achieve a comfortable and secure fit. A practice walk is also a great opportunity to break in new hiking boots or test out any new gear.
Adjust Straps and Load Lifters
Fine-tuning the straps and load lifters on your backpack is crucial for achieving optimal comfort and support on the trail. The shoulder straps should be adjusted so that they sit comfortably on your shoulders without digging in or slipping off. The hip belt should be snug but not too tight, transferring the majority of the weight to your hips. The load lifters, which are located at the top of the shoulder straps, should be tightened to pull the top of the pack closer to your body, preventing it from sagging backward. Experiment with different adjustments until you find the sweet spot that provides the best balance and support when you pack onto your back. Remember, even small adjustments can make a big difference in how your backpack feels on the trail. If you need to pack a backpack for backpacking, then adjust the straps to the correct tension.
Common Mistakes to Avoid When Packing a Backpack
Overpacking: The Weight of Regret (loaded pack)
One of the most common and detrimental mistakes that hikers and backpackers make is overpacking. The allure of being prepared for every possible scenario can lead to a backpack laden with unnecessary items, turning a potentially enjoyable hiking trip into a grueling slog. Each extra ounce adds up, placing undue strain on your back, shoulders, and knees. Before you toss that “just in case” item into your pack, ask yourself: Do I really need this? Is there a lighter alternative? Can I do without it? Be ruthless in your gear selection, prioritizing essential items and leaving behind anything that isn’t absolutely necessary. Remember, the lighter your backpack, the more enjoyable your hiking experience will be. If you are going on camping trips, make sure you only take what you need.
Poor Weight Placement Pitfalls: weight distribution
Even if you manage to avoid overpacking, improper weight distribution can still wreak havoc on your hiking trip. Placing heavy items in the wrong areas of your backpack can throw off your balance, strain your muscles, and lead to fatigue and discomfort. Avoid placing heavy items at the bottom of the pack, as this creates a pendulum effect that can cause you to sway and lose your balance. Similarly, avoid placing heavy items too far away from your back, as this can pull you backward and strain your shoulders. Instead, focus on keeping heavy items close to your back, near your center of gravity. This will help to maintain balance and reduce strain on your muscles. Pack my backpack with the heavy items closer to the spine.
Ignoring Weather Conditions (rain cover)
Failing to account for potential weather conditions is a critical error that can have serious consequences on your hiking trip. Even if the forecast calls for sunshine and clear skies, it’s always wise to be prepared for unexpected changes in the weather. Pack appropriate clothing layers to adapt to varying temperatures, including a rain jacket or pack cover to protect yourself from rain or snow. Bring a hat and gloves to keep your head and hands warm in cold weather. And don’t forget sunscreen, lip balm, and sunglasses to protect yourself from the sun’s harmful rays. Ignoring weather conditions can lead to discomfort, illness, and even dangerous situations. Always check the forecast before you leave and pack accordingly, even if it means adding a few extra items to your backpack. You will need to pack a backpack for backpacking so you can take camping and hiking equipment with you.
Final Tips for Efficient and Comfortable Packing
Checking Weather Forecasts (rain cover)
Before you even begin to pack your backpack, meticulously check the weather forecasts for your destination. This isn’t just a cursory glance; delve into detailed weather reports that provide hourly predictions, temperature ranges, wind speeds, and precipitation probabilities. Understanding the anticipated weather conditions is paramount for making informed decisions about what to bring. If rain is expected, ensure you have a rain jacket or pack cover. If temperatures are predicted to plummet overnight, pack extra insulating layers. A sudden heat wave may necessitate additional water bottle capacity. Failure to check the weather can result in being ill-equipped to handle the elements, jeopardizing your comfort and safety. Always prioritize weather awareness when planning your hiking trip. You will need a hiking backpack in order to take these items on a camping trip.
Using Packing Cubes or Dry Bags (art of packing)
Organization is key to efficient backpack packing, and packing cubes or dry bags are invaluable tools for achieving this. These lightweight containers allow you to compartmentalize your gear, grouping similar items together and preventing them from shifting around inside the pack. Dry bags serve the added benefit of protecting your gear from moisture, which is particularly important for sleeping bags, clothing, and electronics. Using different colored packing cubes can further enhance organization, making it easier to locate specific items quickly. For instance, you might use a blue packing cube for clothing, a red one for first aid supplies, and a green one for cooking gear. By implementing this organizational strategy, you’ll not only save space but also reduce the frustration of rummaging through a disorganized backpack. If you use a waterproof pack, then you will not need to buy so many dry bags.
Keeping Safety Items Accessible
When packing your backpack, prioritize the accessibility of safety items. Your first aid kit, headlamp, map, compass, and any emergency communication devices should be stored in easily accessible locations, such as the top compartment, side pockets, or hip belt pockets. In an emergency situation, time is of the essence, and you don’t want to waste precious minutes fumbling through your backpack to locate these essential items. Familiarize yourself with the contents of your first aid kit and ensure that you know how to use each item. Keep your headlamp readily available for navigating in the dark, and always carry a map and compass, even if you’re using a GPS device. Effective communication is crucial in case of an emergency, so ensure that your phone or satellite device is charged and easily accessible. Remember, being prepared for the unexpected can make all the difference in a potentially life-threatening situation. Always pack correctly, knowing that your backpacking gear might be needed at any moment.
FAQs
Here are some frequently asked questions about how to pack a backpack for hiking or backpacking.
What is the optimal weight distribution in a backpacking pack?
The best way to distribute weight is to place heavy items close to your back, near your center of gravity. This helps maintain balance and reduces strain. Lighter, bulky items like your sleeping bag should go at the bottom of the pack, while frequently used items should be easily accessible at the top. Use compression straps to secure everything in place. It’s also very important to balance the weight distribution on either side of the pack. This means you will have to think carefully about the position of your water bottle, tent, and camping and hiking equipment. If you want to learn how to pack, then you need to consider this point.
How can I minimize the weight of my backpack? (loaded pack)
To minimize weight, start by laying out all your gear and eliminating any unnecessary items. Choose lightweight alternatives for essential items, such as an ultralight tent, sleeping bag, and stove. Use compression sacks or stuff sacks to reduce the volume of clothing and other soft items. Avoid bringing duplicates and consider sharing items with other hikers. Remove excess packaging from food items. It is a good idea to take a trash bag to put the rubbish into once you have unwrapped them. When you pack your backpack, remember to ask yourself if you really need each item you have chosen.
What should I do if my backpack feels uncomfortable during a hike?
If your backpack feels uncomfortable, stop and assess the situation. Check the straps to ensure they are properly adjusted and not digging into your shoulders. Make sure the hip belt is snug and transferring the majority of the weight to your hips. Rearrange the contents of your backpack to improve weight distribution, placing heavy items closer to your back and ensuring even balance between the left and right sides. If the discomfort persists, consider removing any non-essential items to reduce the overall weight. It is very important to test the packed backpack before you leave on a hiking trip and to learn how to pack correctly.
0 Comments